
Is COVID-19 getting you down? Do you feel trapped indoors? It’s difficult to go anywhere or do anything because the world has closed down. I know what you’re thinking…
I can feel my muscles shrinking by the hour!!!
Well, that’s what happens when you can’t get to your local gym to get your pump on. But fear not! You’ll never have to worry about deconditioning ever again! Because now is the perfect time to go and build yourself a home gym!!!
A home gym? Say it ain’t so!
That’s right! All that “home gym criticism” has finally met its match… A full-world lock down. If you’re looking to build and maintain that sexy, pre-beach, monster of a body you’ve got yourself, then now’s the perfect time to figure out how you’re going to accomplish that feat!
You’re going to get through the withdrawal of your public gym addiction by feeding it another gym… home style! You’ll feel better, maybe look better, and have a body that you’ll likely NOT be able to show off because the beaches will STILL probably be closed until the winter! But by then you’ll have a ripped winter bod hiding under your ugly Christmas sweater! Sweet!
I know… You’re a bit unsure about the path towards a home gym and you don’t know where to start. That’s ok. Hold in there, because this might get a bit rough. It’s good that you’ve still got that itch to workout from your pre-COVID-19 life. However, I’m here to tell ya that push-ups aren’t the answer. You’re gonna need some proper equipment.
And when I say “proper”, I’m talking about “sketchy proper”!

First off, don’t ask me about diet, because this article doesn’t care about diet. It cares about working out! Grrrrraaarrrrhhh!!!
Second off, you don’t need that fancy good-life style of gym anyway. Working out at home is where it’s at! You can exercise at your leisure. You don’t have to share. And you can workout naked if you want and no one will look at you funny…
Thirdly, I don’t know if any of this is safe. No guarantees are given and no promises are made. Use at your own caution and discretion. I’m not going to tell you how to do anything with proper form. This article doesn’t care about proper form. It only cares about being a home gym! Again, no guarantees are given. (read the disclaimer!)
Fourthly, I’m writing this at 4 in the morning, sooo… you’re welcome!
Are you ready? Because here… we… go!!!
Boom! Where to get your equipment:
-Fitness Depot? ……Nope! Closed.
-Kawartha Fitness? ……Nope! Closed.
-St. Lawrence Pools and Spa? …… Nope! Closed.
-Walmart? …… Nope! Shitty! And probably out of stock.
-Canadian Tire? …… Nope! Boring and they’re kinda closed and also probably out of stock.
-Kijiji? ….. Let me just start here by saying a big Hell No!!! Dealing with Kijiji people generally sucks because they’re mostly useless. Also, it can be hard to find stuff you’re looking for.
-Any other random fitness store? ….. Nope! Also probably closed and likely sold out.
What the hell are we left with then?
…Home Depot! Well, they’re unfortunately kinda closed now too. BUT… they’re still doing curbside delivery. And…
Home Depot sells workout equipment? Liar!
Whoa whoa whoa! Wait and see! You’re gonna love it! And it’ll likely cost you less than $50! (Again, no guarantees)
You might have most or all of this stuff at home. This is what you’ll need.
The Equipment List:

- x2 Home Depot Orange Buckets ($3.97 each)
- x1 6ft rebar ($6.86)… 1/2” or 3/4” diameter should do.
- x2 bags of sand (~$8 each for 20-25kg bag)
- x1 6ft pipe insulation: (~$2.50 – $8.26: Depending on whether you get the self adhesive version or not…. Try to match the inner diameter to the rebar’s diameter.)
- Duct Tape ($5-$10, or free if you’ve got some already!)
- x2 Concrete Blocks (~$3-4 per block. Preferably sized at 8x10x16”, but an 8x8x16″ will work fine too)
- x1 Wood Plank: 12″ x 4′ (~$5-15). You could do this several ways; either buy a 12″ x 8′ board, or buy a 2″x6″x8′ board and cut it in half and put the two halves together to make a 12″x4′ plank. The latter way is cheaper. HD can also cut either option in half for you.
- x3 chairs (free from your kitchen!)
Optional Items:
- x1 Wheelbarrow (You probably have one already)
- blanket or towel for cushioning on top of the wood plank
- rebar end caps to help prevent potential sliding of bucket handles off the bar (aka: safety feature)
- 4 regular size bricks or small pieces of wood (use as shims to help with minor height adjustments)
- Velcro Straps ($8.39): These can assist in securing the bucket handles to the rebar for increased efficiency and safety. Highly recommended.
Gardening equipment!?!?! Are you crazy?
Why yes, I very well might be…
Why do we want these things? Because they’re awesome. And you’re building yourself a friggin HOME GYM! It’ll be fun! You’ll see!
These items are also great because they’re industrious, they’re useful for gardening and other stuff after the public gyms re-open, and you’ll likely still want to keep them as a home gym just because they’re bad ass and show off your resiliency super power! Did I mention they’re portable AND generally waterproof? And can also be used outside! Spring is here! There’s nothing like an outdoor workout! However, you may want to tame the working out naked part, depending on where your neighbours are situated at.
Obviously these things aren’t fancy schmancy, and neither will be the workout! It’s not to meant to be. It’s meant to get the job done. Back to basics, barbell style!
What’s so special about these particular items?
Explanations and Illogical Reasonings!
Orange Buckets (5 gallon): They’re cheap! They each hold up to 84lbs in weight. They have a handle, thus they’re basically a giant dumbbell. So, what can you fill them with? Water works! Water is basically low cost/free. One litre of the stuff weighs 2.2lbs. A 5 gallon bucket holds 20 litres. Therefore, each bucket can hold up to 44lbs of water. You can also fill the buckets with sand.
Bags of sand: Sand is denser and heavier than water. It’s a bit more expensive, but if you’ve gotten some solid strength built up already, you’ll require something that creates more resistance. If you get the “play sand” version, you can have yourself a nice little sandbox beachy area post COVID! Ok… One 25kg bag of sand weighs 55lbs. It has a volume of approximately 12.5 litres. Therefore 1.5 bags of sand per bucket should get you pretty close to the 84lbs limit we talked about. I wouldn’t try to go past that because bad things might happen. Sand also tends to splash less than water, so there’s that.
Rebar: Why? Because it’s used in construction for adding strength which means it’s sturdy as hell! This will be your barbell. Barbells are simple, efficient and easily loadable for compound exercises, and thus highly effective. The lowest grade of rebar is rated at 40 KSI which is equivalent to 40,000 lbs per square inch; a weight limit much more than you’ll be lifting. To put it another Marvelous way, you are to the bar what Bruce Banner is to the Incredible Hulk! If you load one orange bucket on to each end of the rebar, you’ve now have some “plates” for your “barbell”! Still think I’m nuts? You’re probably right. Anyway, next up….
Pipe insulation: Since the rebar is smaller in diameter than a traditional barbell, you’ll want a bit of cushioning when you’re using it and to add some thickness for better grip. These pipe insulators come in different sizes. Try to match the inner diameter of the pipe insulator with the diameter of the rebar. It’s ok if it’s a bit larger, you can always trim it to fit. Also, a lot of them come with an adhesive strip on one side, so you might even be able to skip the tape part below.
Just pop the 6ft insulator onto the rebar and you’re all set. Almost! Next, about one foot in from each end, cut out about a 1/2″ wide notch. This notch is where the bucket handles will sit in.
Duct Tape: Add tape around the pipe insulators if you feel they need more security. Perhaps even add some tape to better secure the bucket handles to the bar. Remember, I did say this would be “proper sketchy”, Red Green style!
Concrete Cinder Blocks: A normal barbell at a gym would be approx 7 – 8” off the ground when loaded with plates. We will have to simulate this distance because of how far the bucket handles – and hence the rebar – are off the ground. The cinder blocks will create a perfect platform to stand on to get you close to that 7 – 8″ mark.
Lumber board: It’s hard to bench press without a bench! Just lay this board across a couple of concrete blocks and now you’re elevated off the ground, giving your elbows space to move on the downward part of a bench press movement. If you went with the 2x6x8 cut-in-half option, use some of your duct tape to secure them together… or screws… or faith and prayer… whatever works right?
Chairs: These will help with simulated elevation for various exercises like shoulder pressing. Everyone should have chairs. If you don’t, then you probably have more pressing issues to worry about than building a home gym…
Wheelbarrow: This one is interesting. It’s got two handles, and can be loaded up with a lot of weight. Therefore you could use it as a “neutral grip” barbell for benching and dead-lifting.
Go and order all the things you need from Home Depot and get it delivered or do a curbside pick up. Wipe and Disinfect everything when you get it.
What exercises can I do with this equipment?
Alright. We have all of our supplies, but what exercises can we do with them? Well, in a time of mass pandemic and chaos, it’s better to keep things simple. Now is not the time to be doing silly things like Turkish Getups…
These are the following movements we’ll cover:
- Squat
- Dead lift
- Bench press
- Barbell Row (aka Pendlay Row)
- Shoulder Press
- Pull-ups (if you’ve got yourself a pull-up bar, or a tree in your yard! Playgrounds are closed for pull-ups)
Why these movements? Because they’re compound exercises, work a crap ton of muscles, and are the most efficient use of your time.
A quick note on exercise form and safety
If you don’t know how to do an exercise with proper form, this can lead to injuries. So, DON’T do any of these movements if you DON’T know what you’re doing. JUST DON’T! Go do burpees instead. Well, don’t even do burpees if you don’t know how to do burpees either… Go for a walk or something…
…OR…take the time to learn these exercises! Time’s pretty abundant these days, so, NO EXCUSES!
Some good form references can be had on You Tube, or exercise books and manuals such as Starting Strength and Strong Lifts.
This gym setup doesn’t have typical “clips” to hold the weights in place. All there is are the pipe insulators on either end with the cut out notch to stop the buckets from moving up or down (and duct tape if you so chose). With this in mind, be careful when doing the exercises. Avoid tipping the bar off center during the movements because you don’t want loaded buckets sliding down toward your grip or off the bar itself. Be aware of your balance. If you’ve got a couple of zip ties laying around, you could use those to help secure the buckets to the bar. Or better yet, just use those velcro straps I mentioned earlier. If you happened to purchase a couple of rebar end caps that I mentioned earlier, they can also help with safety in this regard.
Also, don’t do something stupid and dangerous like using buckets with broken pieces or rusted handles.
And DON’T you dare use those silly fold-up chairs! They’re unstable and generally a bad idea!
Beware of Wind!
Exercise specific instructional strategies and setup
Squats: Since we don’t have squat rack, we’ll have to get inventive. Get three of your kitchen chairs. Put them somewhere flat outside, in a row, and approximately 2 feet apart, facing you. Put your loaded up orange buckets on each outer chair. Get your rebar positioned under each bucket handle. Sit in the middle chair and get the rebar onto your back. If the bar is too low to get onto your back at this point, you will need to increase the height of the buckets further.
This can be done by adding a cinder block onto each chair underneath the buckets, and also if you’ve got a couple small pieces of wood or bricks laying around for finer adjustments. Get your form all set and locked in, then start your squat by standing up with the bar. Finish by sitting back down.
If you don’t want to do “chair-style squats” like above, you can do the standing version. Use the same setup, but this time step backward a couple feet before you start your squat.

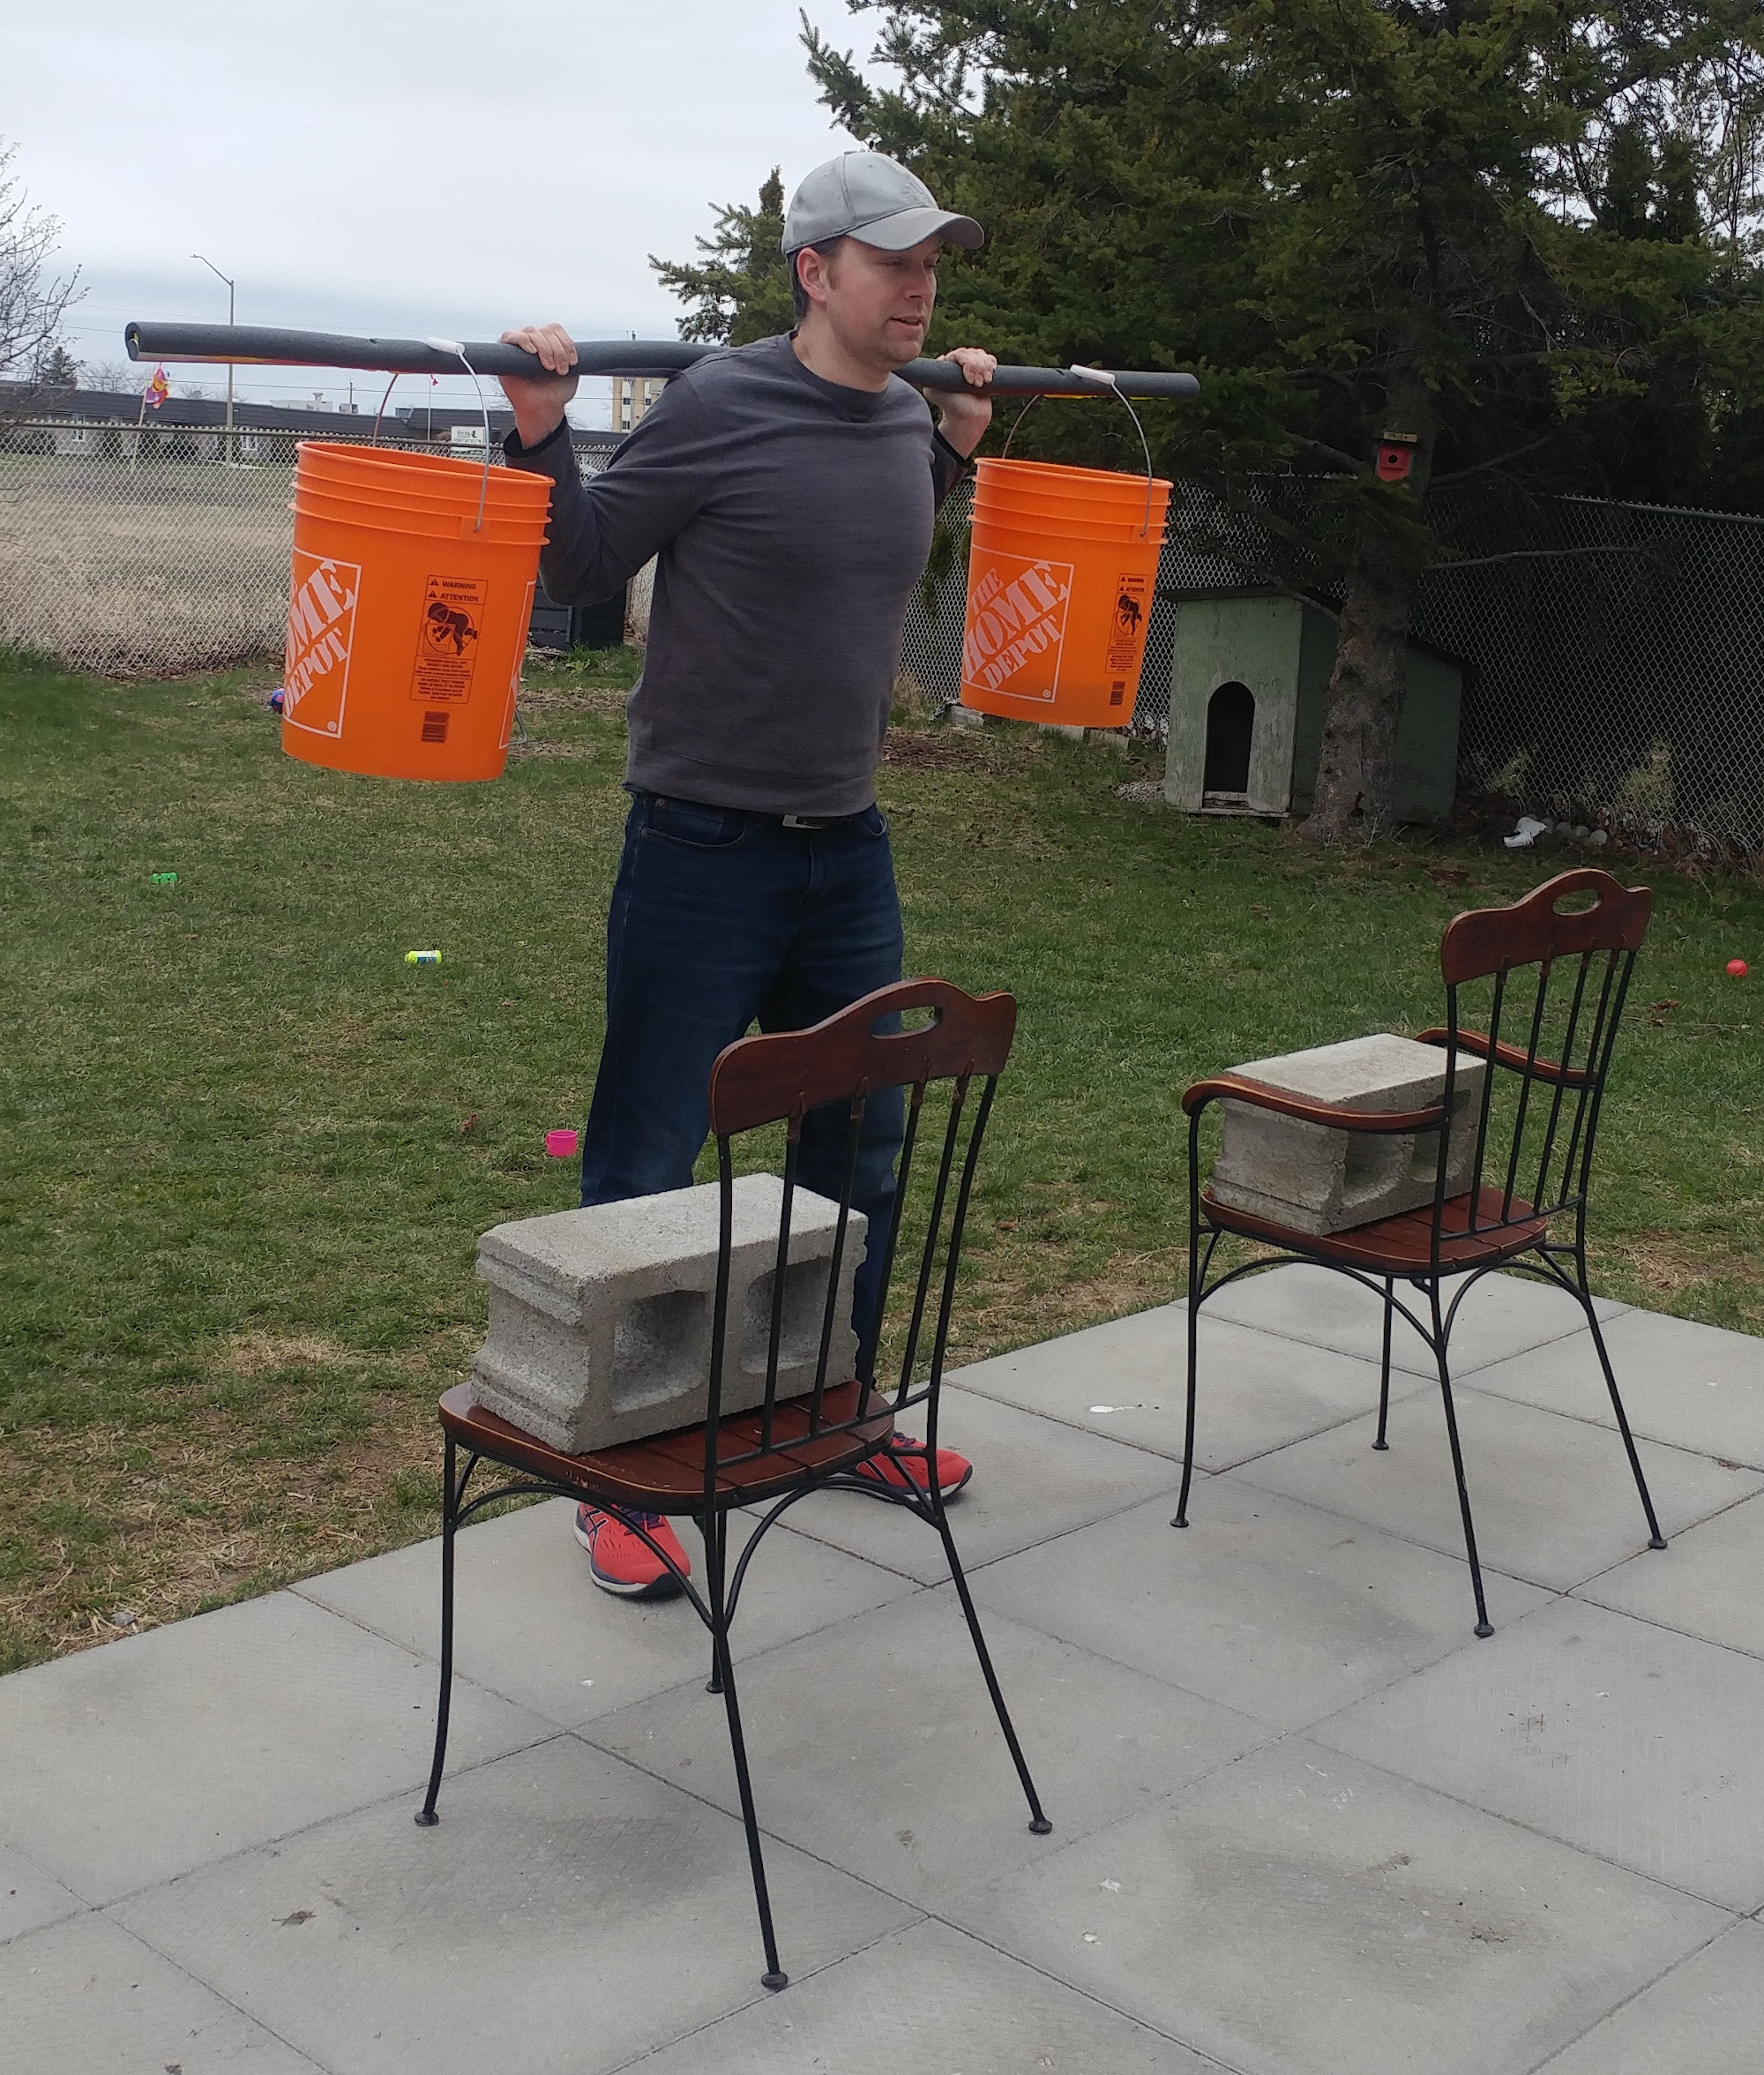
Squat alternatives: If you’re having trouble with the above setup(s) and proper form, try these two options:
-Option 1: Grab a bucket in each hand, do lunges.
-Option 2: Set two cinder blocks up beside each other or stack them on top of each other for a harder challenge. Grab a bucket in each hand, do step-ups.
Bench Press: This one is a bit trickier because you normally need a bench to do exercise, hence the name. Grab your two cinder blocks, and line them up on the ground. They should be positioned approximately where your butt and the upper middle of your back will be when you’re in a laying position. Lay your lumber board across the two blocks. Take your two orange buckets and place them on each side of the wood plank, about 2 feet away. Grab your bar, lay down on your make shift bench. Thread the bar under each handle.
This might get a bit tricky as it will be pretty much down to your chest at this point; you may need a 2nd person for assistance and require some brick/wood shims for height adjustment. Once in place and you’re all formed up, start benching.
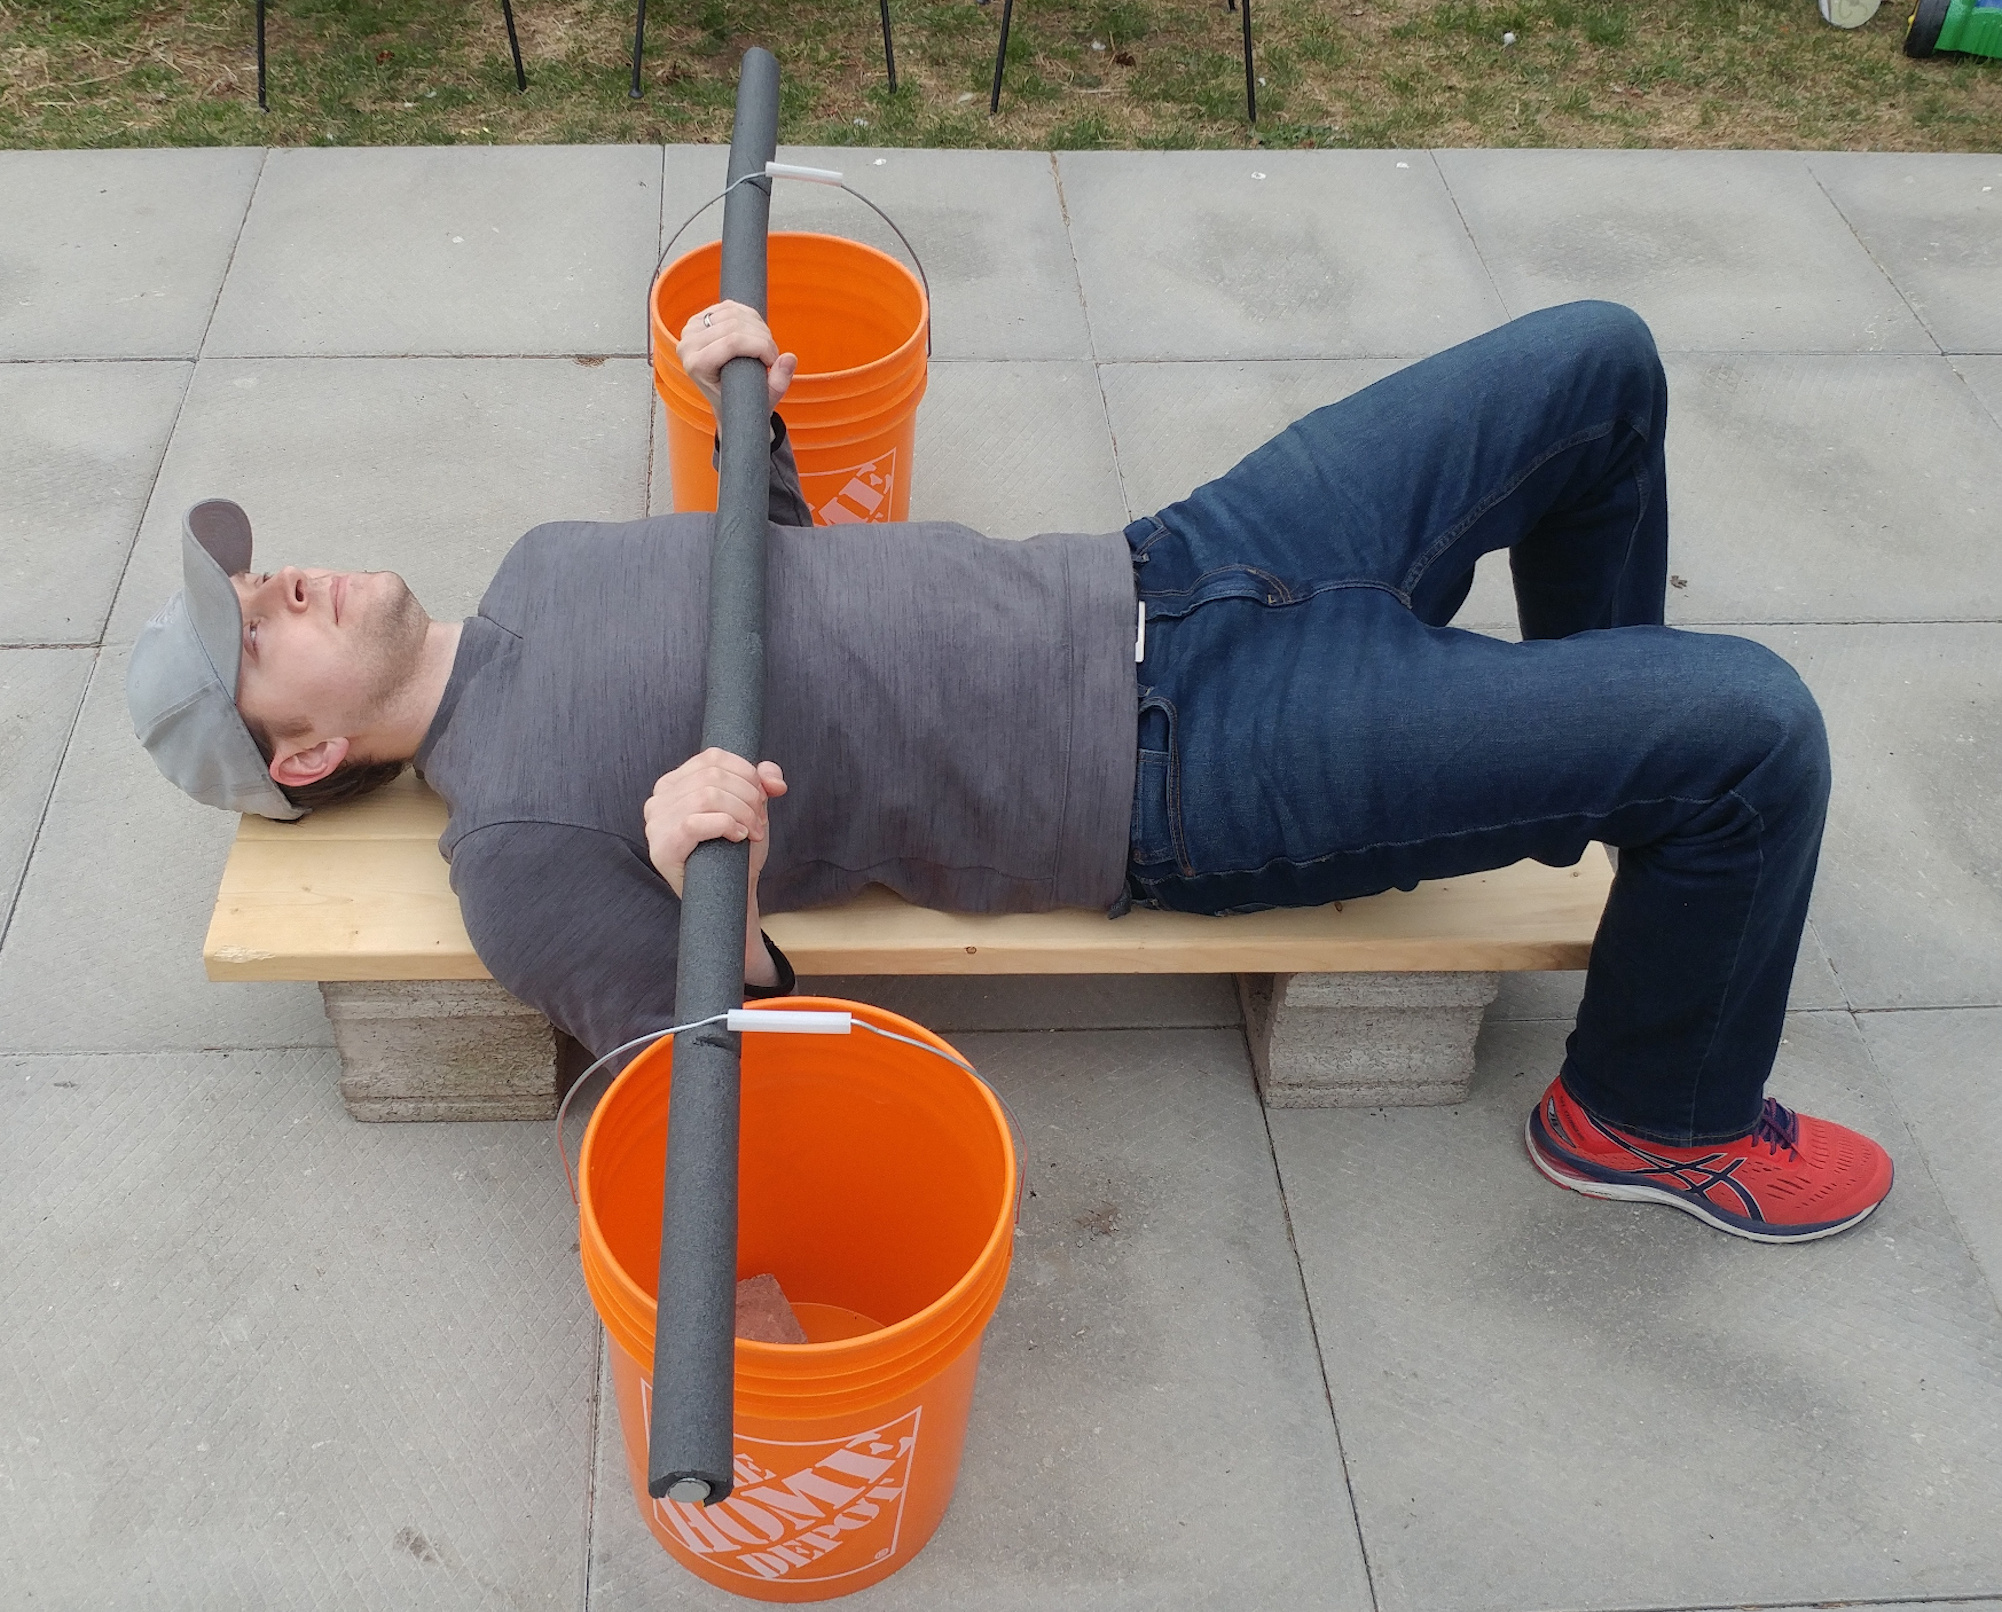
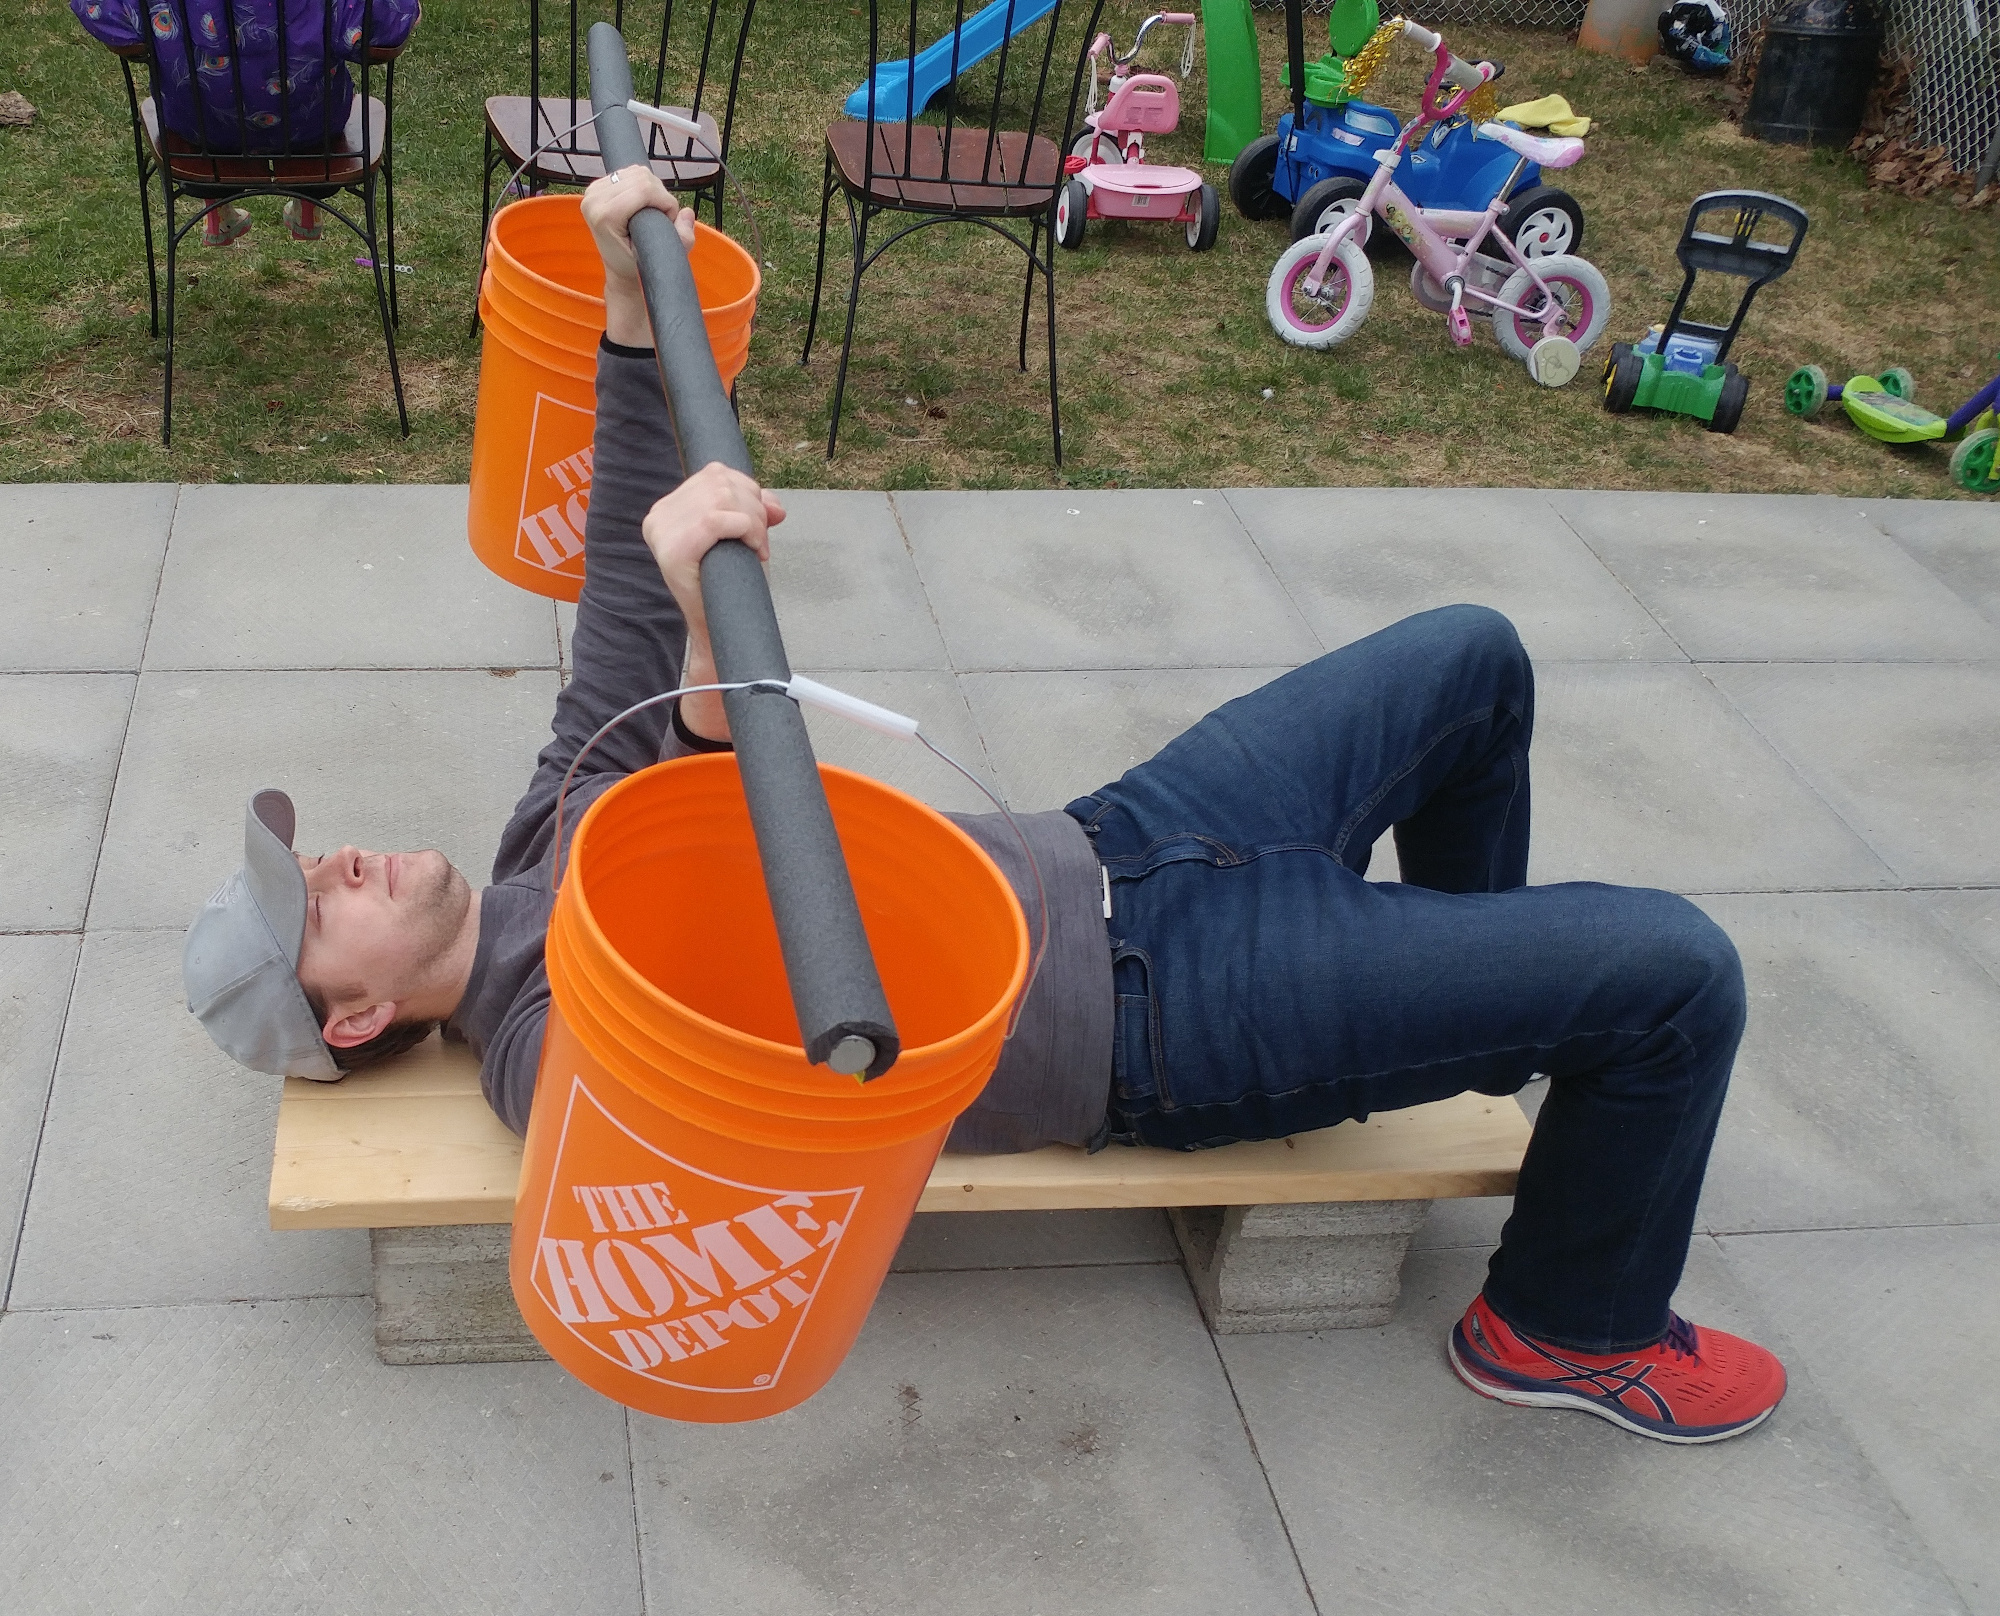
Bench Press Alternative (AKA, “The Benchbarrow“): Since the above setup can be tricky, another option is to use a wheelbarrow if you have one. This option uses a neutral grip. Use the cinder blocks and board setup as with the bench press. Adjust the bench height if required with brick/wood shims. Move the wheel barrow handles over the top part of the bench. Lay down on the bench and get into position. Start your bench press.
Using a wheelbarrow will also makes it more difficult in regards to balance. Once you lift the handles off the ground, the only point of contact with the ground is the wheel. This makes the exercise more challenging but also increases the use of stabilizer muscles.


Note: The way the handles will angle up during the concentric phase of the movement which adds a bit of incline to the bench press.
Dead Lifts: A normal dead lift has a conventional barbell positioned approx ~7.5 inches off the ground**. Because we’re using buckets with handles, the rebar will be about 18-19 inches off the ground. We’ll need to add some sort of platform to elevate us up closer to the bar. A couple of cinder blocks will work perfectly. Use ones that are 8” or 10” in height. Position your cinder blocks 6 -8 inches apart. The orange buckets will be on the outside of each block, approximately 2 feet away. Get your rebar set up under both bucket handles. Step up on to your platform and get into dead lift starting position. Start your dead lifts.

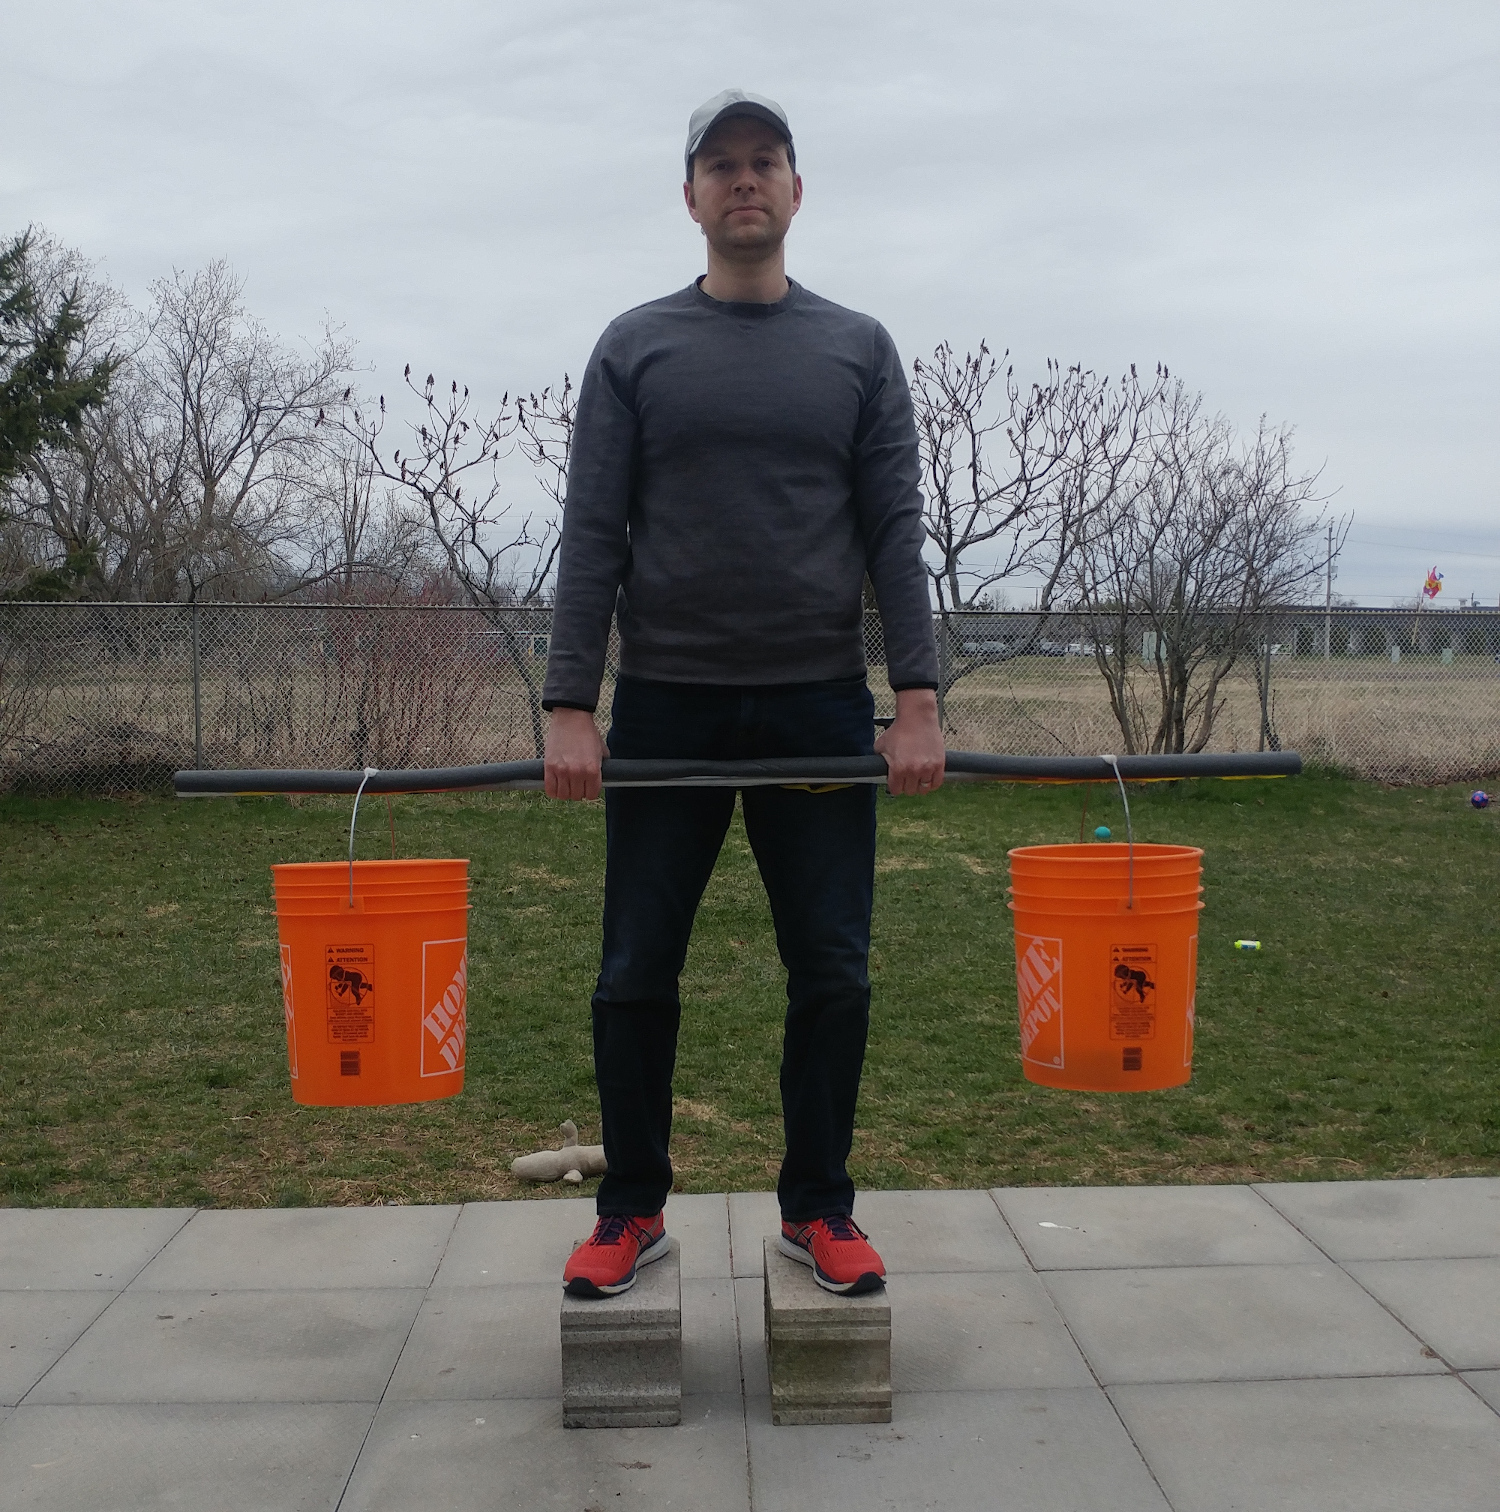
Dead Lift alternative (AKA: “The Deadbarrow”): You can use a wheelbarrow to dead lift as well. But just as with the bench press alternative, you’ll need to platform yourself up to the right level before starting the exercise. This version also uses a neutral grip.
Note: The wheel may cause the barrow to move slightly back and forth during the movement.
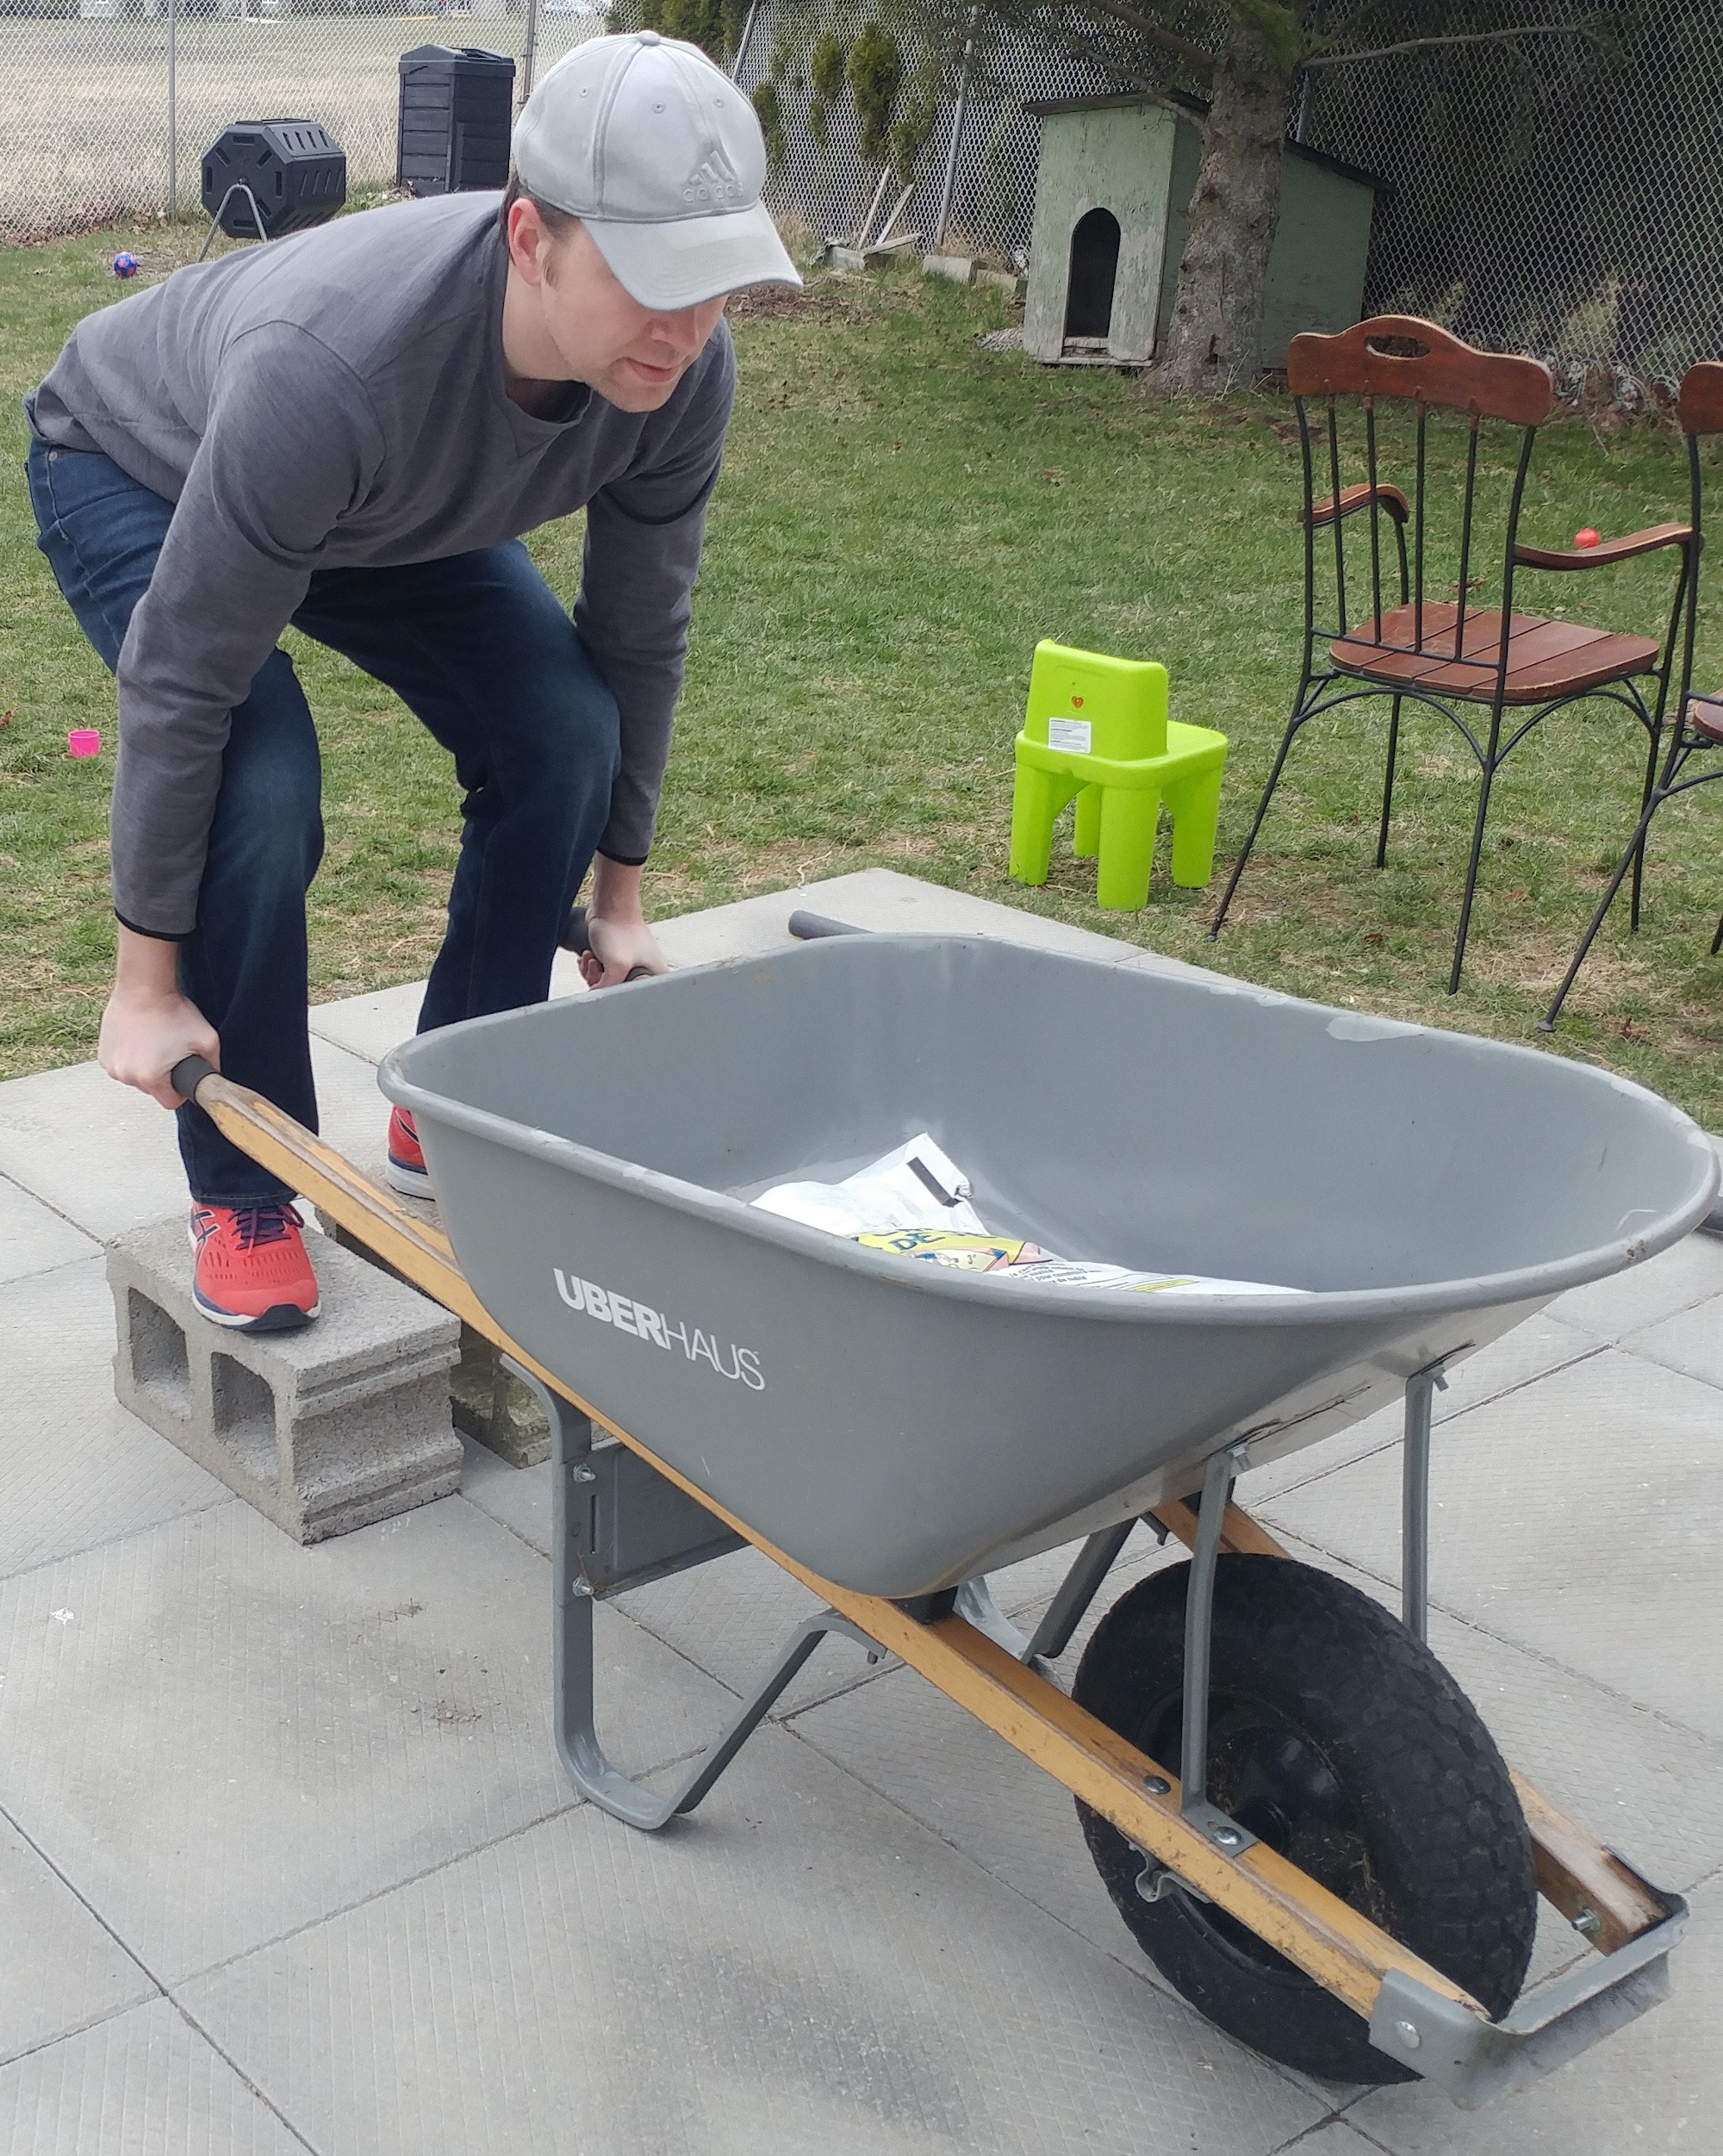

Barbell Rows (or Pendlay Row): Rows use same equipment set up as dead lifts. Get into the row starting position; begin your rows.
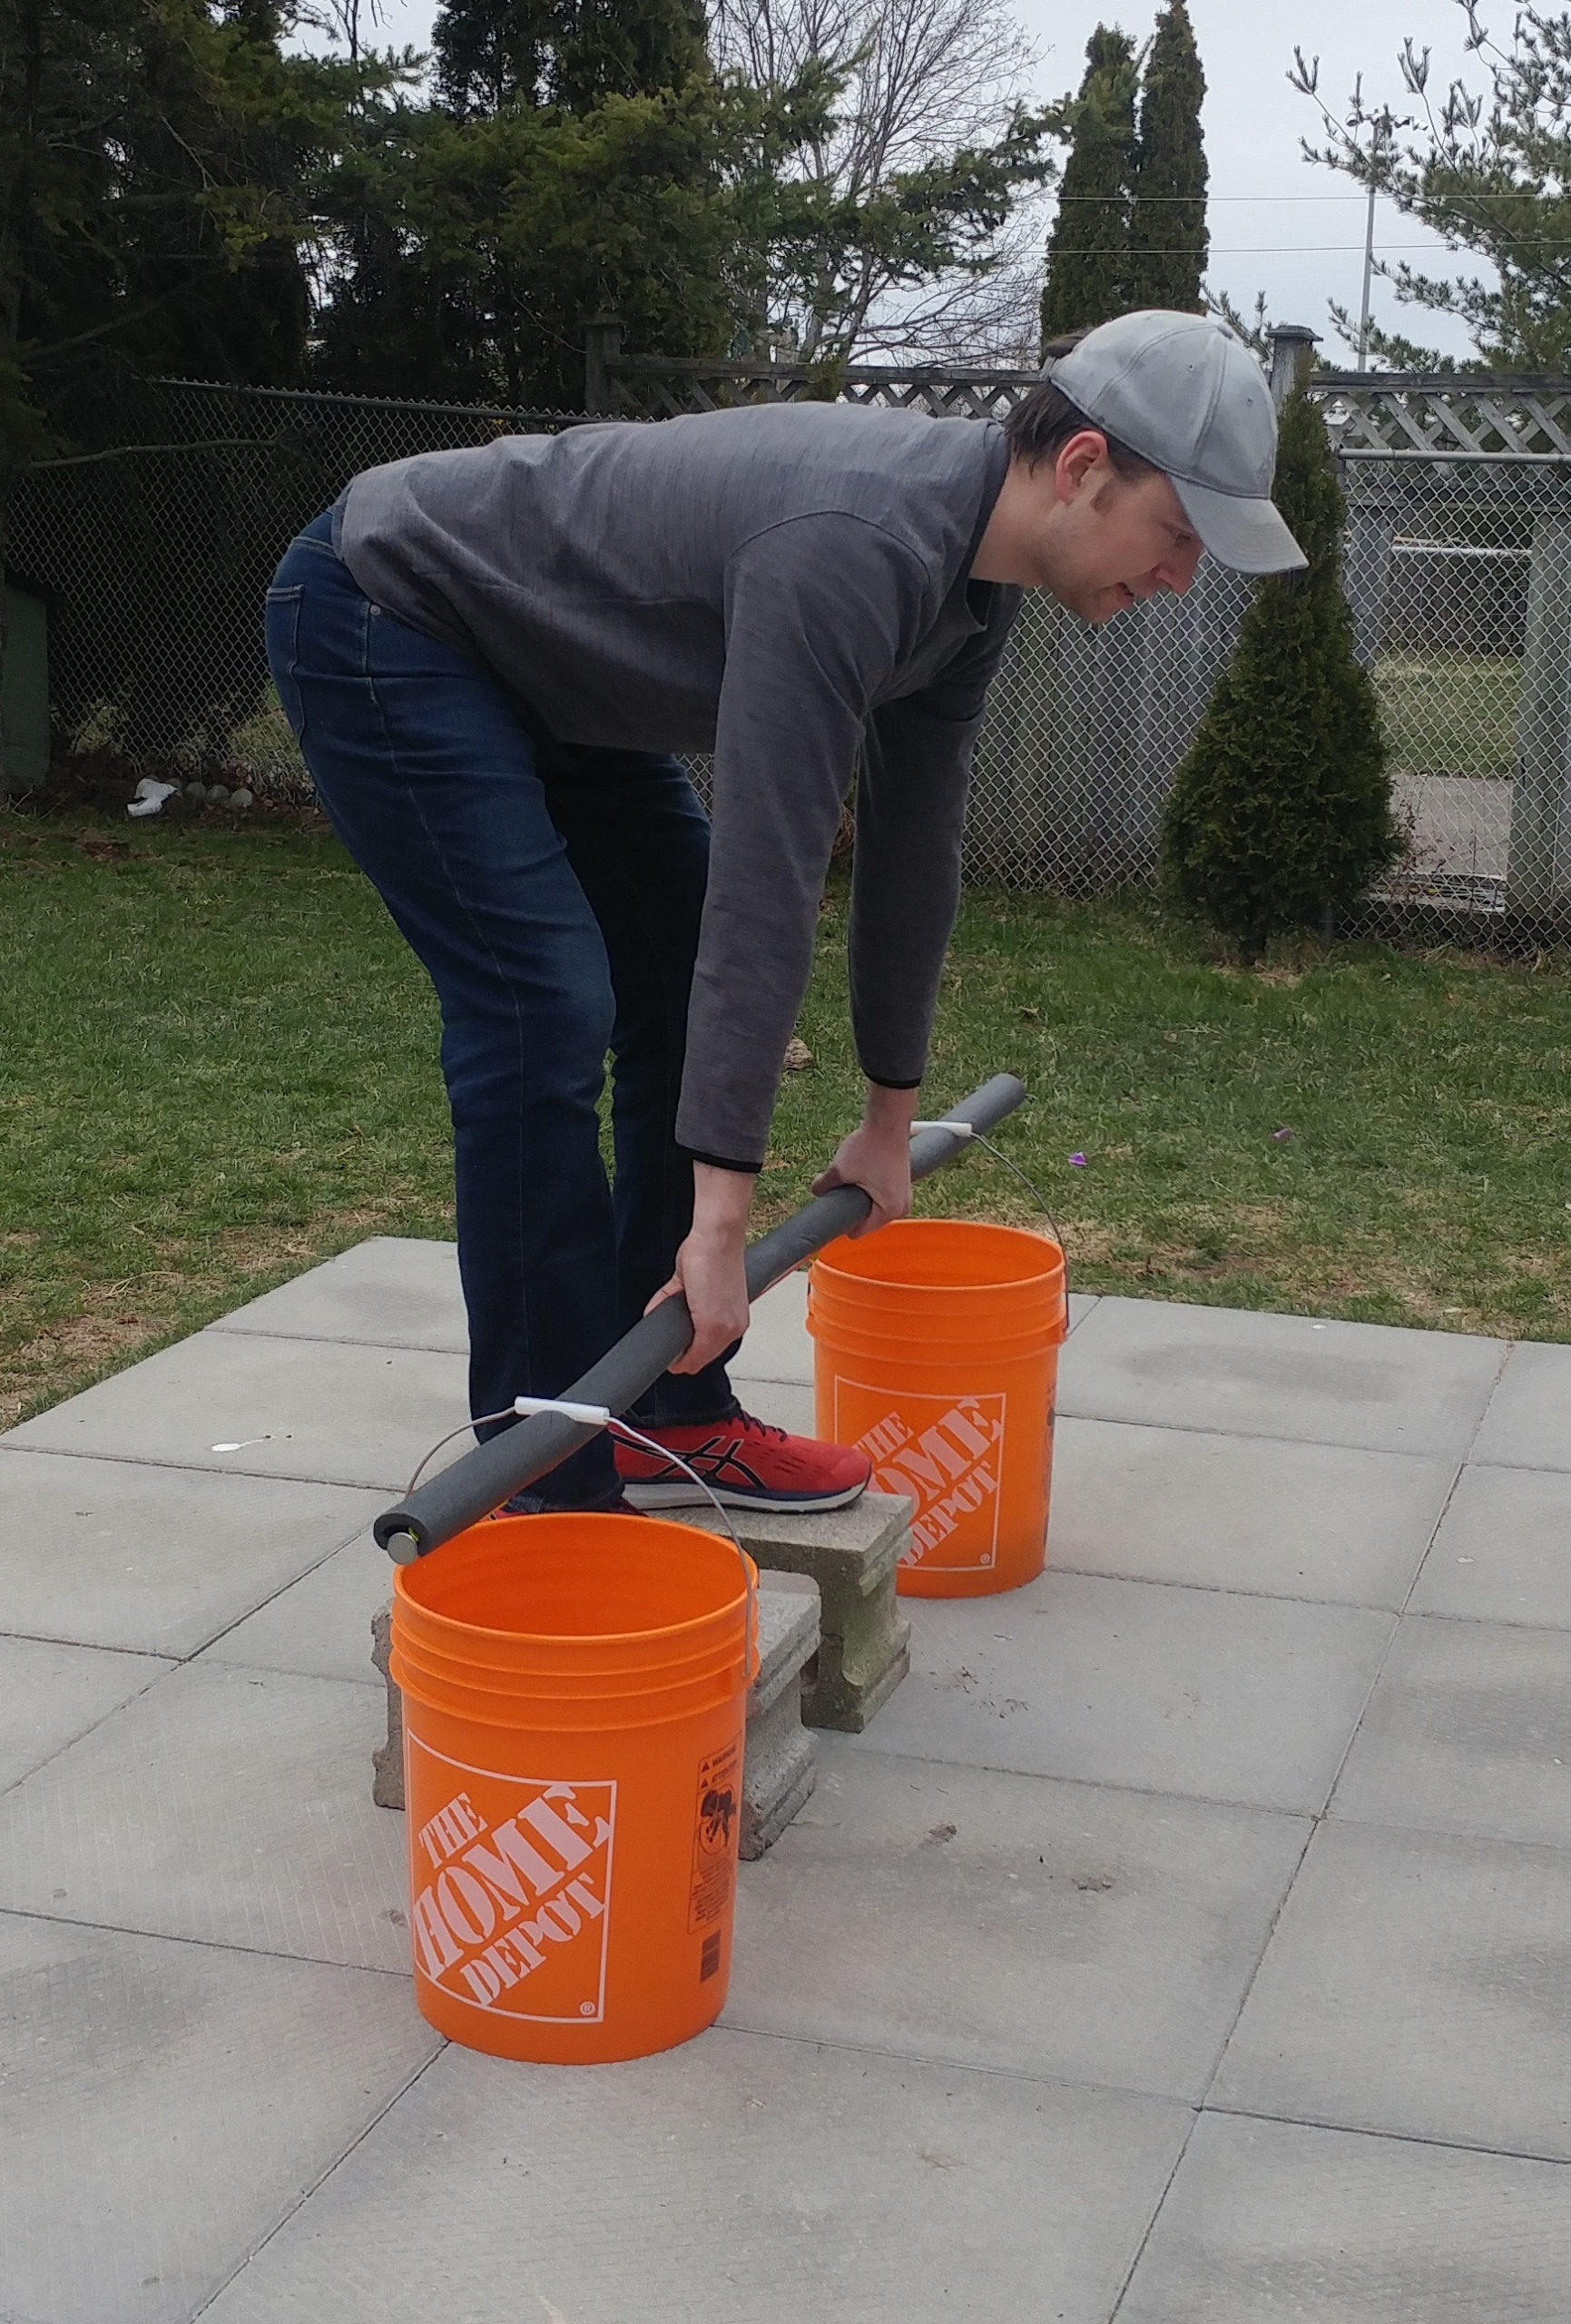

Note: Pendlay rows are an explosive version of barbell rows. You might get more longevity out the orange buckets by doing regular barbell rows instead of Pendlay rows. However, you won’t be able to lift as much weight.
Shoulder Pressing: This one is fun. Get three chairs, preferably the same height. Line them up in a row, approximately 2 feet apart, with the outer seats facing toward you. The middle chair can be further back a few inches. Put an orange bucket on each outer chair. Put your barbell under each bucket handle. Sit in the middle chair, holding the barbell in shoulder press starting position. Adjust bar/bucket height as necessary with brick/wood shims. Start pressing!
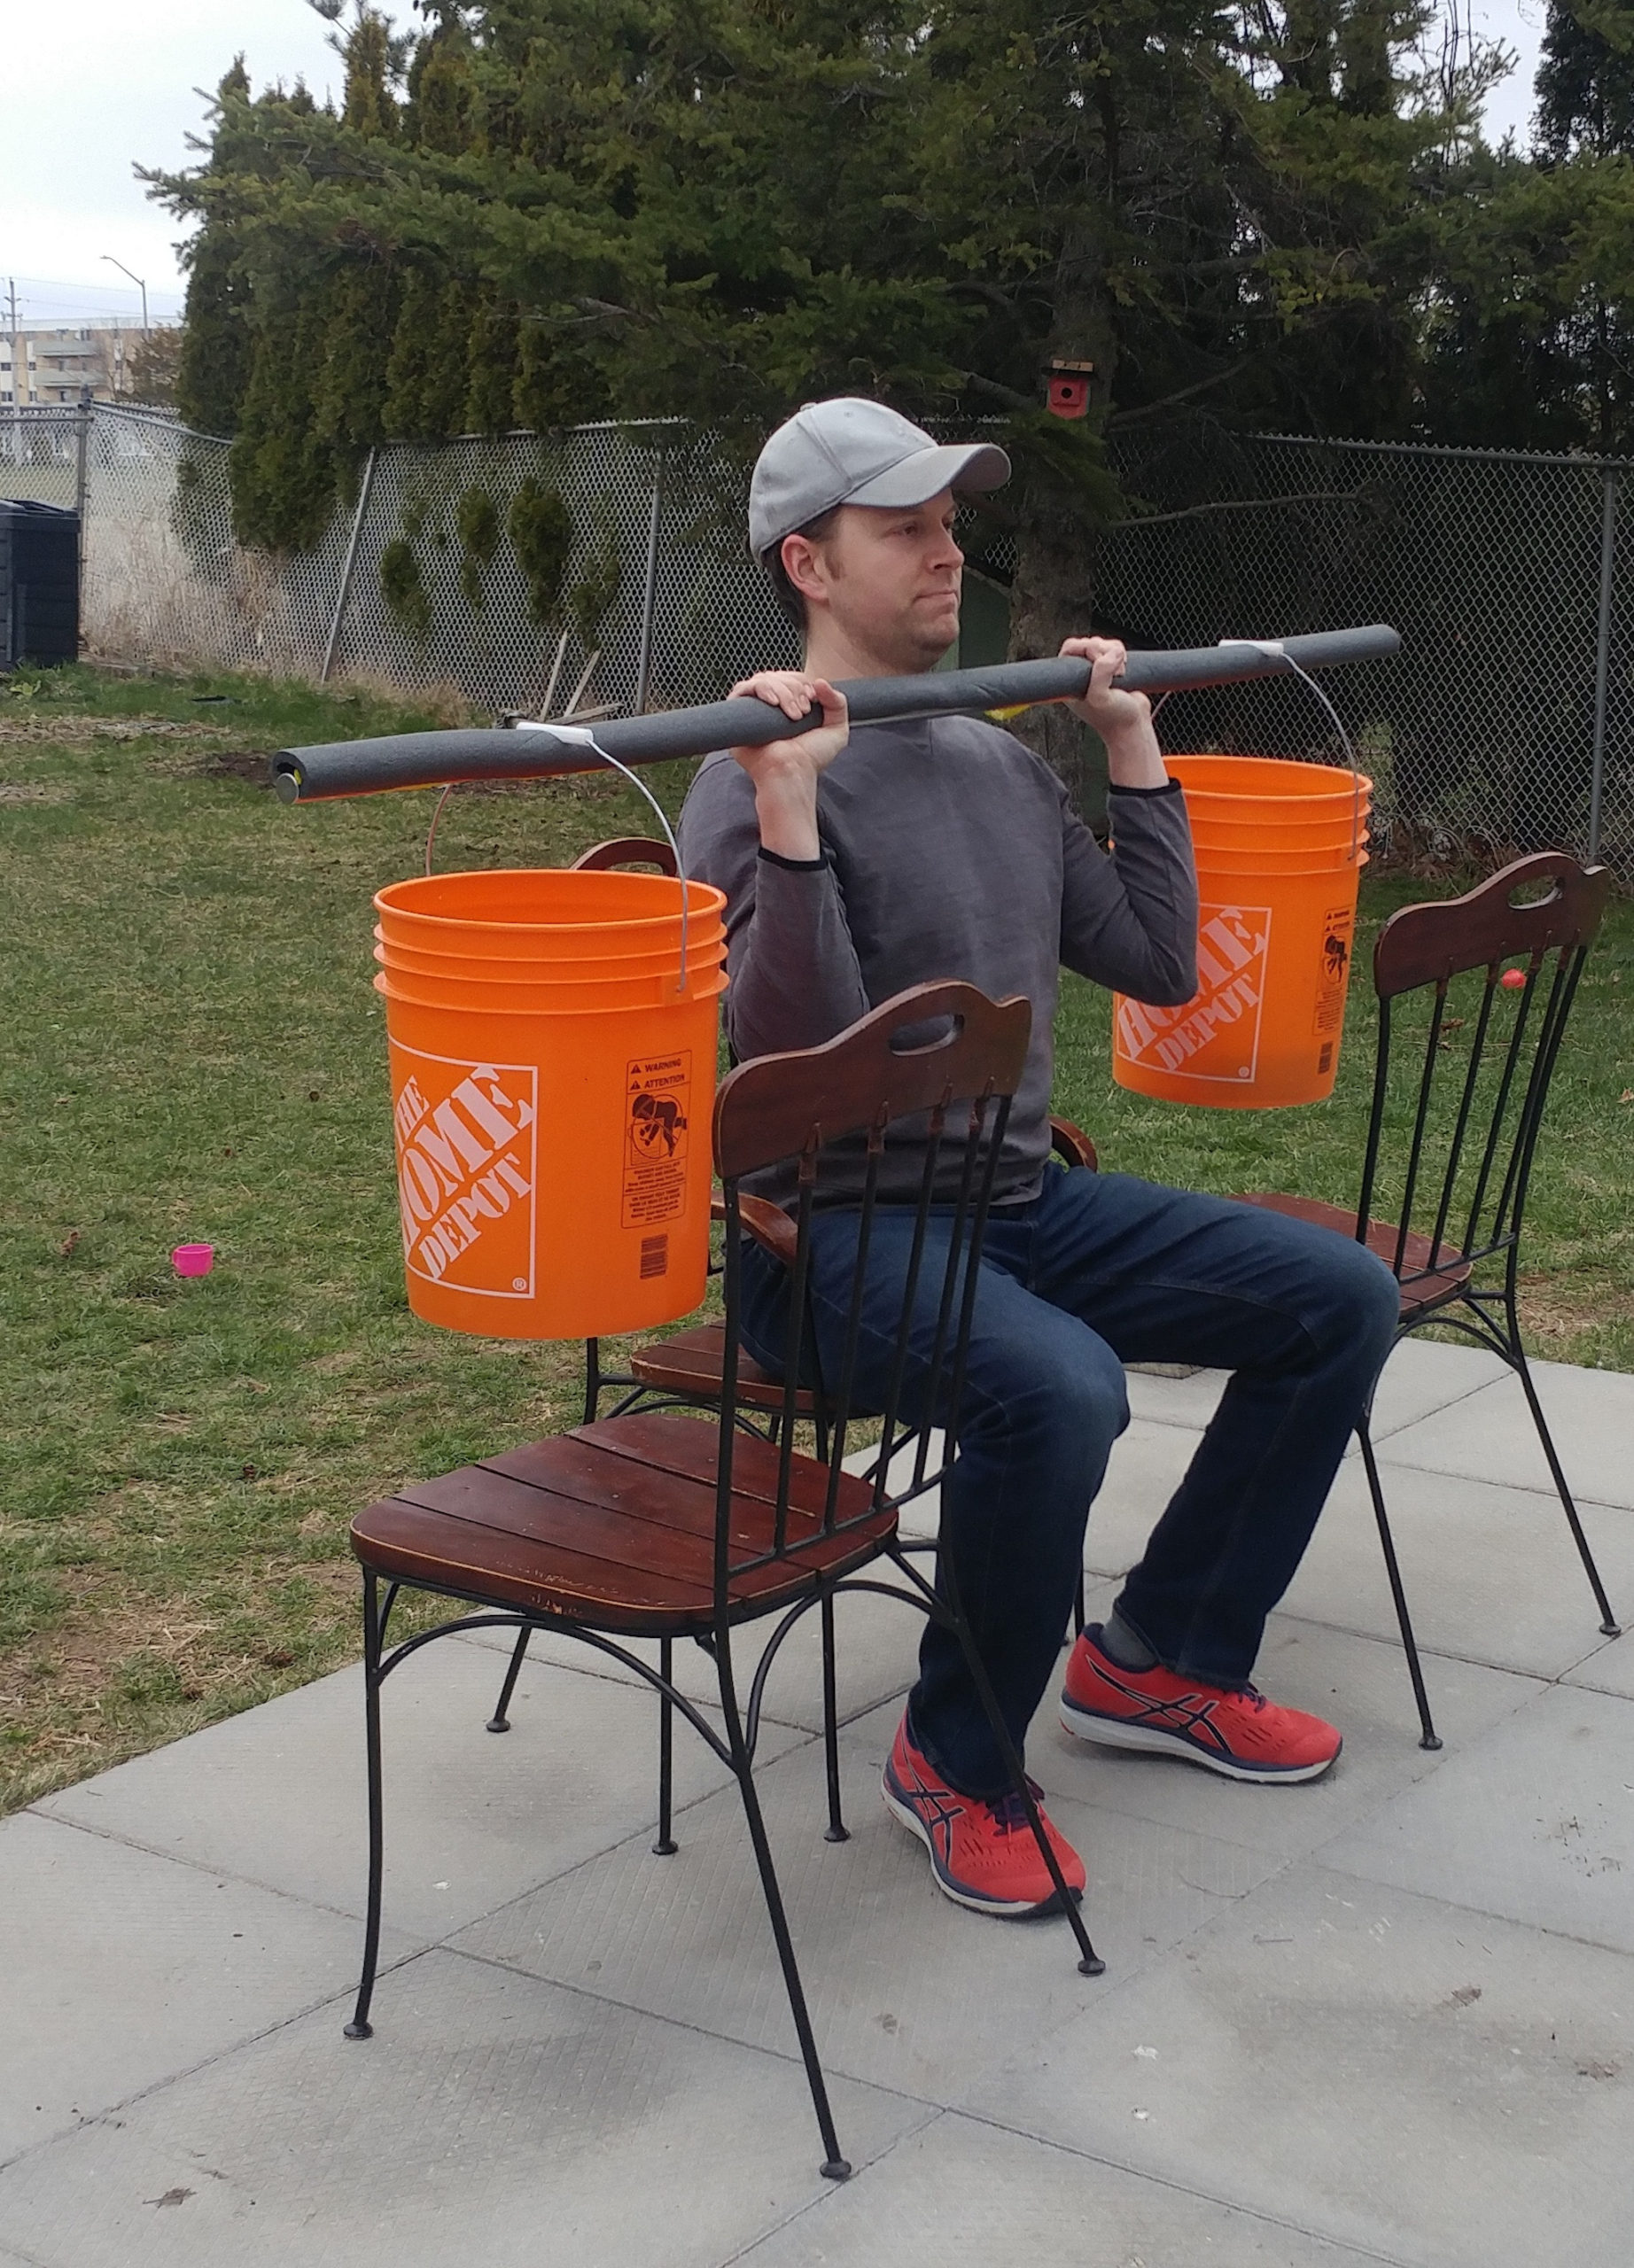
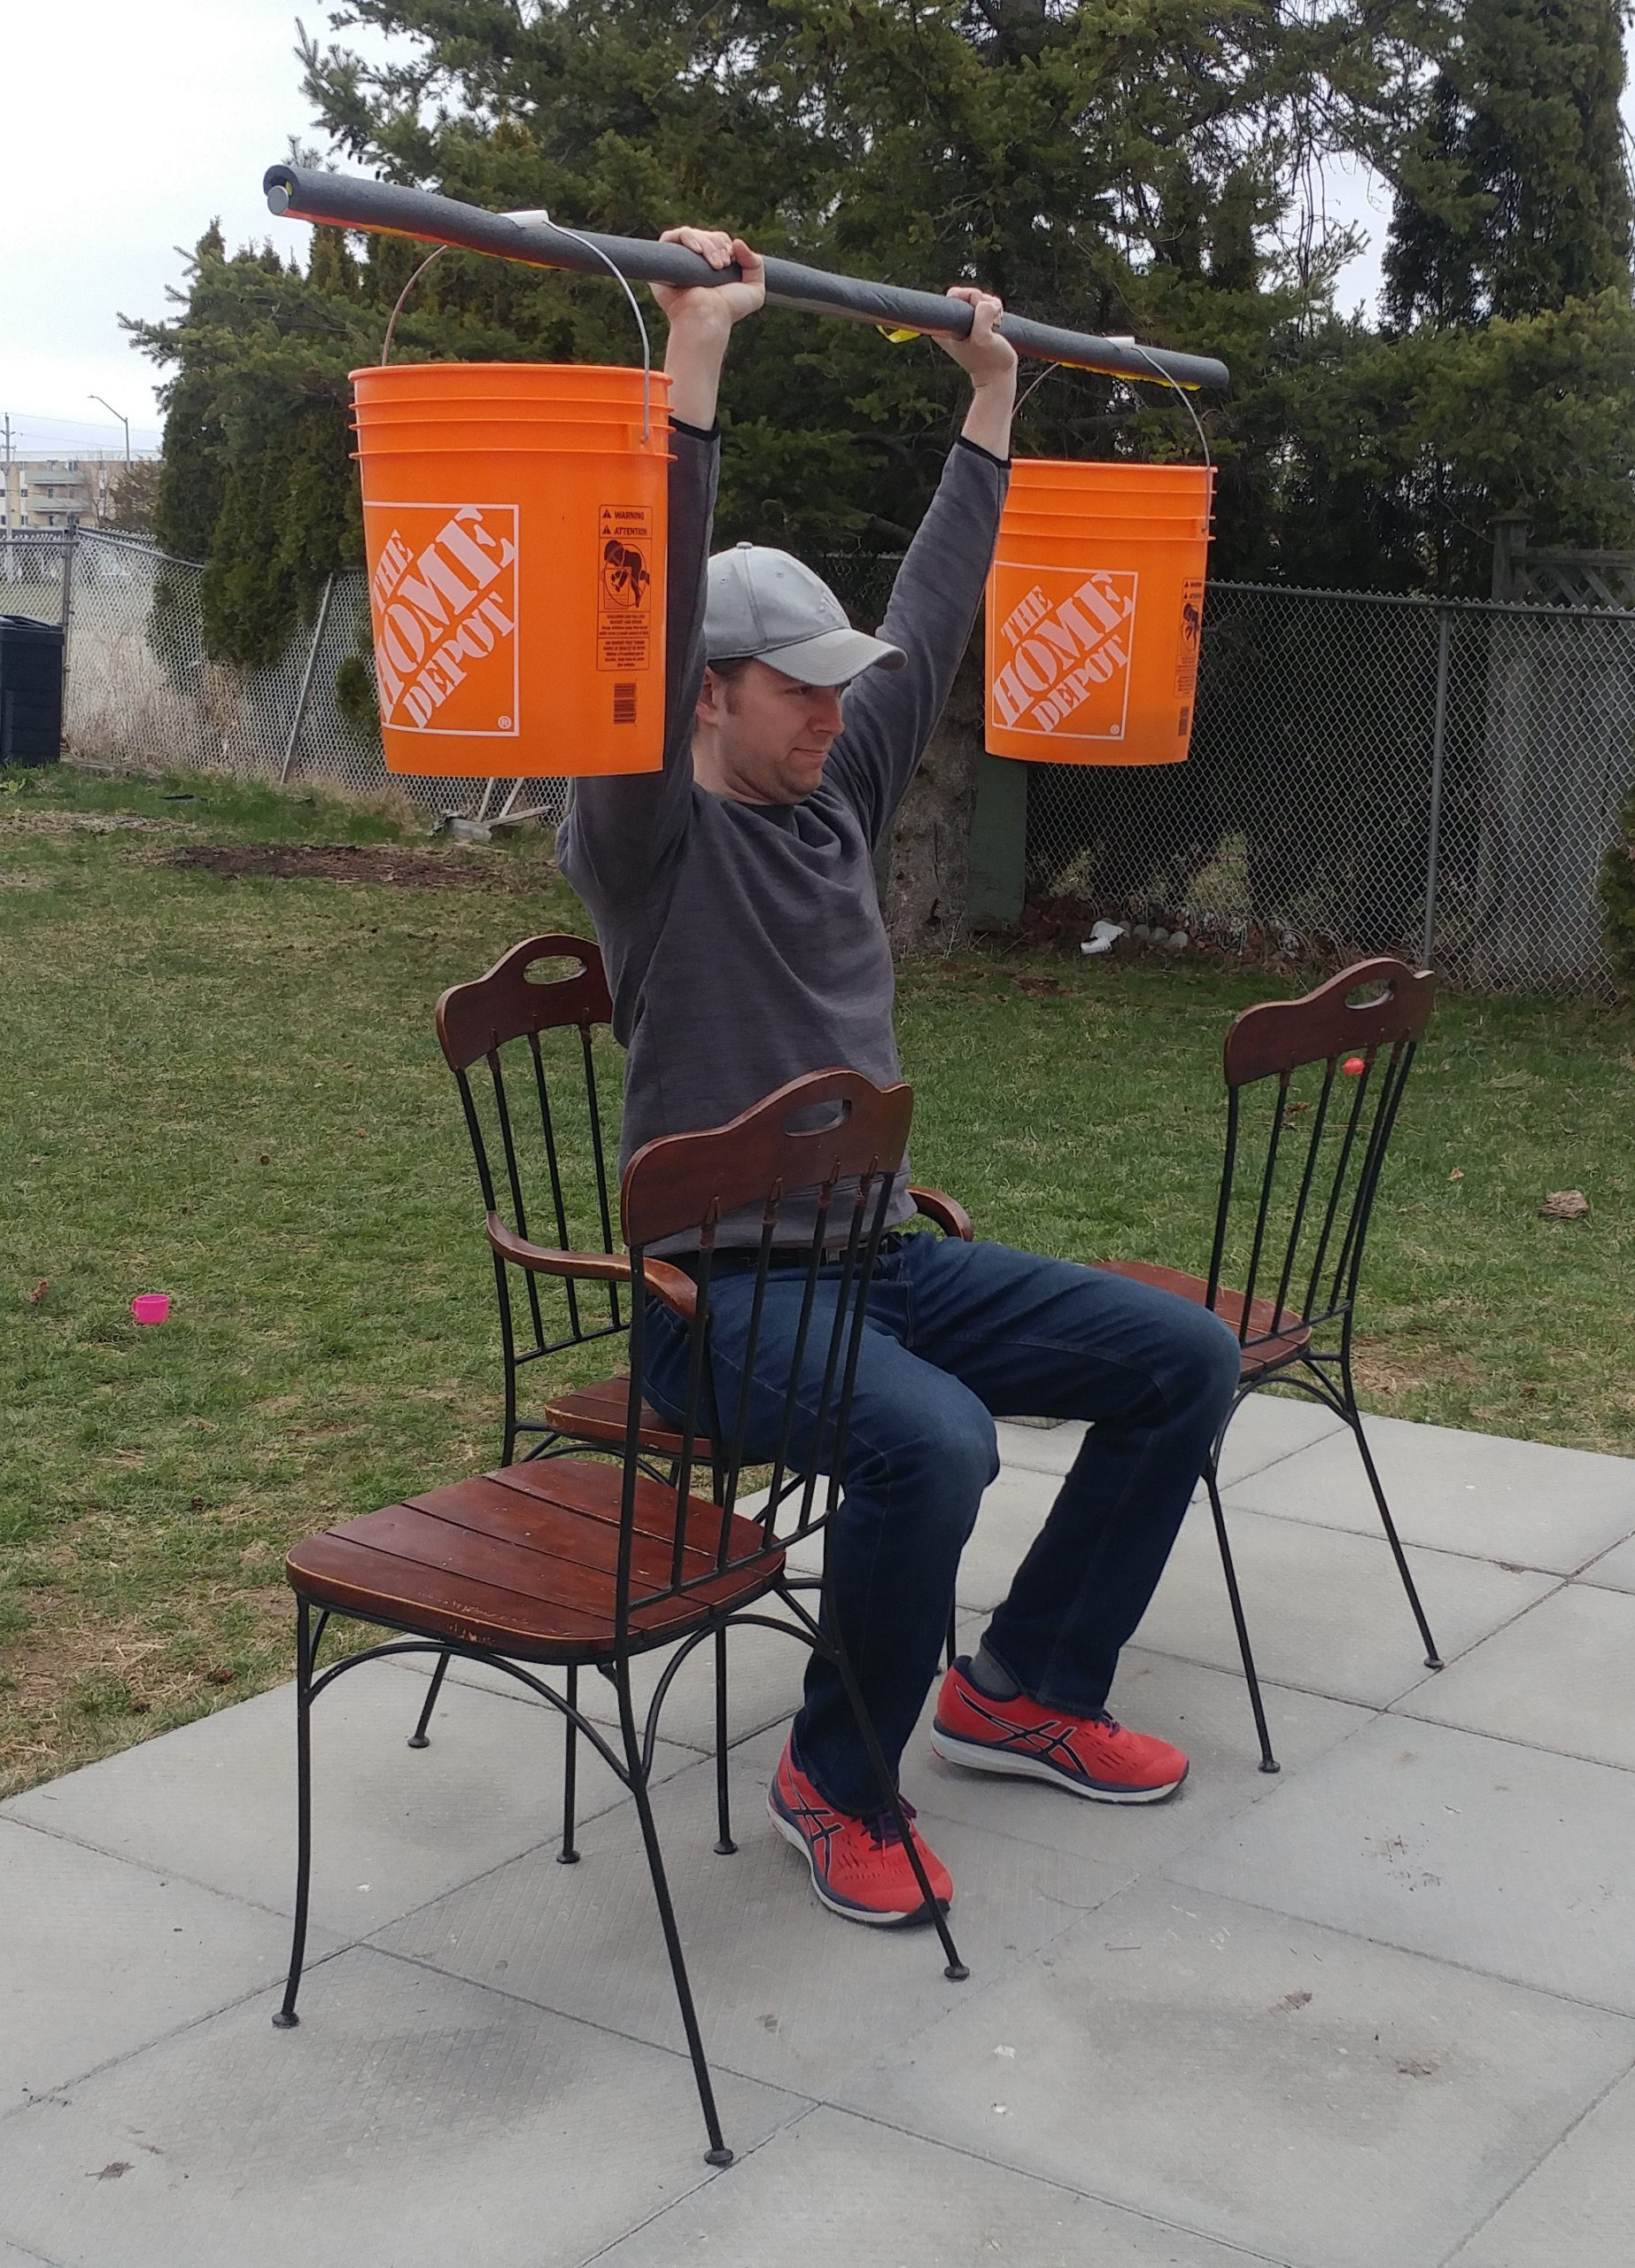
Note: The shoulder press as described above is the sitting version. The standing version is preferable however. Just stand up before you begin the movement, and sit back down when finished.
Pull-ups: I know these are cheating a bit because they’re mainly done with body weight instead of loaded resistance. But they’re still really good for you and quite challenging. If you’ve already got yourself a pull-up bar at your home, go for it. If you don’t, your local playground is out of luck so you’re best bet is a tree in your yard with a somewhat level branch. How to do one? Grab a bar or tree limb and pull yourself up! Simple!
Isolation Exercises
In this time of societal lock-down, there’s no point it getting too finicky about what you’re trying to do. Keep it simple stupid. (Don’t do stupid things though!) And don’t mess around too much! Just get the job done. The above compound lifts are all you really need to maintain your fitness through these unprecedented times.
However, if you really want to add in some more exercises, go for it. Do curls, lat raises or whatever else you feel like doing that can be done with the buckets.
Some Finer Notes
It might seem a pain in the butt to keep adding and removing water or sand from the buckets when changing exercises or sets. Here are some hints. Mark the inside of the buckets with permanent marker at various height levels for each litre of water that you add. This lets you know how much water, and hence weight is in there. If you don’t want to waste water when you’re removing it, get yourself a third bucket to store the excess in until you need it again.
For the sand option, get yourself some old plastic coffee containers or plastic peanut butter jars. Fill them with sand and put the lid on. Measure their weight and mark them. Now you have easily addable and removable “weight plates” to put in your buckets.
This setup has a max weight loading limit of ~168lbs. That probably won’t be a problem for most people. If you can move more than this weight, that’s ok too. But you’ll need to adjust your workouts to make it more challenging, like decreasing rest times, increases reps, or increasing sets.
I would highly recommend securing your rebar to the buckets via the pipe insulator notches with tape, zip ties, or even a couple of velcro straps. This is more for efficiency’s sake as it can be a pain the butt to to try and line up the notches with the handles. When the handles are secured, it makes hand positioning and form set up a lot easier and quicker. Of course, this will add a bit of extra work if you want to remove the buckets to do isolation exercises (unless you’re using velcro). But as I’ve stated previously, the compound exercises are the best bang for your buck, so just leave the buckets attached.
Due to the mobility of the bucket handles on the bar, the buckets may sway slightly during the movements. Therefore, all the exercises will be a bit harder than using the typical “local gym” bar and weight setup. However, this should act as an intensifier for your accessory muscles and actually serve as a benefit for strength and stability gains.
The Finale
There you go. A simple home gym for ~$50. Useful both as exercise and gardening equipment! You’ll be healthier, happier, and fitter! And more importantly, you’ll be ready to go for beach season 2021! Sweet!
Do you really use this setup yourself?
Heck no! I already have a home gym. I’ve had it for years. But if I didn’t, I’d use the buckets.
Did you at least test it out?
I sure did! (See photo evidence above) It works, and works well!
Is it rickety as all get out?
You’re darn right it is! Well, it’s actually surprisingly descent. And it’s way better than no gym!!!
When COVID-19 is finally over, then you can focus on getting yourself a proper home gym setup for the next time the world closes.
Remember, sharing is caring, except when you’re at a public gym during a pandemic.
Stay Active, Stay Fit, Stay Safe!
*You could go get your supplies at a different hardware store like Lowe’s or Rona, but I just prefer Home Depot. And I like the colour orange… 🙂
**If you’re not quite at the ~7-8 inch level for the dead lift setup, that’s ok. It’s acceptable to be a little higher or lower during these crazy times. If you’ve got a couple of extra small pieces of wood laying around, you could always add those to the top of your cinder blocks to assist with the elevation requirements.
